

Are you wondering if your radon mitigation system needs maintenance? You’re not alone.
Many homeowners install these systems to protect their families but then forget that regular care is just as important. Ignoring maintenance could mean your system isn’t working as well as it should—putting your health at risk without you even knowing.
You’ll discover why keeping your radon mitigation system in top shape matters, how to spot warning signs, and simple steps you can take to ensure your home stays safe. Keep reading to protect your home and peace of mind.

Credit: www.angi.com
Importance Of Radon Mitigation Systems
Radon mitigation systems play a crucial role in protecting your home and health. Radon is a radioactive gas that you cannot see, smell, or taste, yet it poses serious health risks. Having a system in place can significantly reduce radon levels and keep your indoor air safer.
Understanding why radon mitigation systems matter helps you appreciate the need for their proper care. These systems do more than just reduce radon—they offer peace of mind and a safer living environment. But how do you ensure they keep working effectively over time?
What Makes Radon Mitigation Systems Essential?
Radon exposure is the second leading cause of lung cancer after smoking. Without a mitigation system, radon can accumulate to dangerous levels inside your home. Installing a radon mitigation system lowers this risk by venting the gas outside.
Think about your family’s health—would you take a simple step to reduce a silent threat? The system acts as a protective barrier, giving you control over something you can’t detect yourself.
How Radon Systems Improve Your Home’s Safety
Besides lowering radon levels, these systems improve overall air quality. They prevent radon from seeping through cracks in the foundation and walls. Over time, this keeps your home environment healthier and more comfortable.
Imagine the difference in air quality after installing a proper mitigation system—you can breathe easier knowing the invisible danger is being handled. This improvement can even increase your home’s value and appeal.
Why Regular Maintenance Matters For Radon Mitigation Systems
Just like any other home system, radon mitigation requires upkeep. A system that isn’t maintained can lose efficiency or stop working altogether. This could leave you exposed without realizing it.
Have you checked your system’s performance lately? Simple actions like monitoring the fan and pressure gauges can make a big difference. Keeping the system in top shape ensures it continues protecting your home effectively.
Signs Your System Needs Maintenance
Radon mitigation systems protect your home from harmful radon gas. These systems need regular checks to work well. Signs show when maintenance is needed. Spotting these early keeps your home safe and your system effective.
Increased Radon Levels
Higher radon levels inside your home signal a problem. Use a radon test kit regularly. If readings rise above safe limits, your system might not be working properly. This often means maintenance or repairs are necessary.
Unusual Noises From Equipment
Listen for strange sounds from the mitigation system. Buzzing, rattling, or humming noises can mean parts are worn out or loose. Quiet operation is normal. Noises suggest the system needs a professional check.
Visible Wear And Tear
Check the system’s pipes and fan for damage. Cracks, holes, or rust reduce its effectiveness. Loose connections or worn seals allow radon to leak. Visible wear means it is time for maintenance.
Regular Maintenance Checklist
Keeping your radon mitigation system in top shape requires regular attention. A maintenance checklist helps you track essential tasks to ensure your system works effectively and keeps your home safe. Missing small issues can lead to bigger problems or reduced efficiency over time.
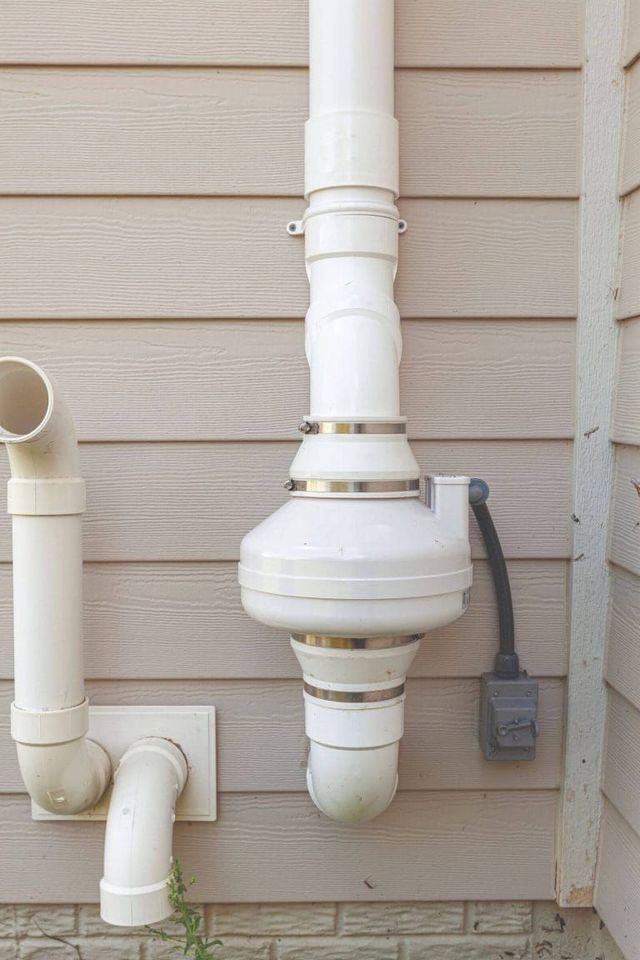
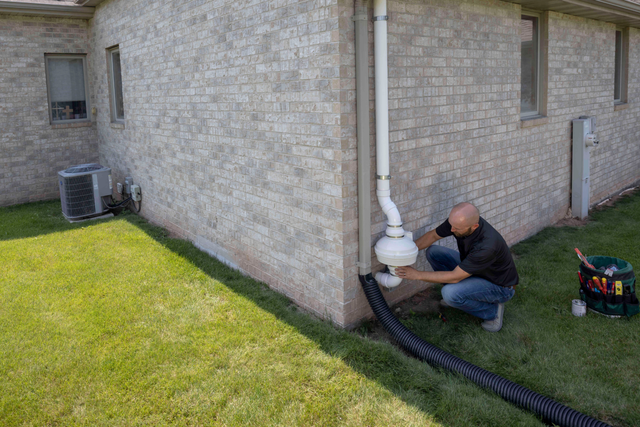
Inspecting The Ventilation Pipes
Check the pipes for any visible cracks, bends, or disconnections. Even a small gap can let radon gas escape into your home. Make sure the pipes are securely attached and free of obstructions.
During one inspection at my own home, I found a pipe slightly shifted out of place after a heavy storm. Fixing it immediately prevented a potential increase in radon levels. Have you checked your pipes recently?
Fan Functionality Check
The fan is the heart of your system, pulling radon out from beneath your home. Listen for unusual noises or vibrations that might indicate wear or motor issues. Also, ensure the fan is running continuously as designed.
If your fan stops working or runs inconsistently, radon can build up quickly. I once caught a fan failure early because the usual hum stopped, and it saved me from weeks of unsafe air. Do you hear your fan running now?
Sealing Cracks And Openings
Radon can enter your home through tiny cracks in floors, walls, or around plumbing. Regularly inspect these areas and seal any gaps with appropriate materials like caulk or epoxy. This reduces the workload on your mitigation system.
After sealing even small cracks in my basement, I noticed the radon levels dropped noticeably. It’s a simple step that can make a big difference. Have you looked closely at your foundation for openings lately?
Credit: www.johnnyenviro.com
Professional Inspection Vs. Diy
Deciding between a professional inspection and DIY maintenance for your radon mitigation system is important. Both approaches have pros and cons. Understanding these can help keep your home safe from radon gas. A regular check ensures the system works well and protects your family.
Benefits Of Professional Services
- Experts spot hidden issues quickly and accurately.
- Certified technicians use specialized tools for testing.
- Professionals ensure the system meets safety standards.
- They can repair or replace parts properly.
- Regular professional inspections may extend system life.
- They provide detailed reports and advice.
Diy Maintenance Tips
- Check the system fan for unusual noises.
- Look for cracks or damage in pipes and seals.
- Keep the area around the system clean and dry.
- Test radon levels with an at-home kit every few months.
- Replace filters or fans as recommended by the manufacturer.
- Note any changes in system performance or noise.
Common Issues And Troubleshooting
Radon mitigation systems are designed to protect your home, but like any mechanical setup, they can face issues that affect their performance. Recognizing common problems early can save you from costly repairs and ensure your home stays safe. Let’s look at some typical challenges and how you can troubleshoot them effectively.
Addressing Fan Failure
The fan is the heart of your radon mitigation system. If it stops working, radon gas won’t be drawn out properly, putting your home at risk. You might notice unusual noises or no sound at all from the fan.
Check if the fan blades are clogged with debris or dust. Sometimes, simply cleaning the fan can restore its function. If the fan doesn’t start after cleaning, it could be an electrical issue or a worn-out motor, which often requires professional replacement.
Have you tested your fan recently? Running a simple airflow test or feeling for suction near the vent pipe can help you spot a fan failure early.
Dealing With Power Loss
Power interruptions can halt your radon system instantly. A sudden loss of electricity, tripped breakers, or faulty wiring might be the cause. Without power, the fan cannot operate, so your home could be exposed to radon gas.
First, check your circuit breaker or fuse box to ensure the system’s power source is active. Look for loose connections or damaged cords that might disrupt electricity flow.
If power outages happen frequently in your area, consider a backup power solution. Have you thought about how long your system might be off during a blackout? A backup battery can keep your system running when you need it most.
Handling System Alarms
Some radon mitigation systems come with alarms to alert you about malfunctions or elevated radon levels. Ignoring these alarms can be risky. When an alarm sounds, it’s your system’s way of telling you something needs attention.
Start by reading the alarm manual to understand what the signal means. Sometimes, alarms trigger due to minor issues like a temporary power loss or sensor fault.
If the alarm persists, it’s important to inspect the entire system. Check for pipe leaks, fan operation, and electrical connections. How quickly can you respond to these alerts to keep your environment safe?
Cost Of Maintenance And Repair
Radon mitigation systems need maintenance to keep working well. Understanding the cost of maintenance and repair helps homeowners plan their budgets. These costs vary based on system type and the extent of needed repairs. Regular upkeep prevents expensive damage and ensures safe indoor air quality.
Budgeting For Regular Checks
Regular system checks usually cost less than major repairs. Scheduling annual inspections helps spot problems early. Set aside a small budget each year for these checks. This cost often ranges from $100 to $300 depending on your location and technician rates.
Ignoring routine checks can lead to bigger issues. These might result in higher repair bills and longer system downtime. A steady maintenance budget keeps your system reliable and your home safe.
Understanding Repair Costs
Repair costs depend on the problem size and parts needed. Minor repairs like fan replacements can cost $150 to $400. More complex issues, such as fixing ductwork or electrical parts, might cost $500 or more.
Some repairs may require professional service, adding labor fees. Always get quotes before work begins to avoid surprises. Keeping your system in good shape reduces the chance of costly repairs.
Extending The Lifespan Of Your System
Extending the lifespan of your radon mitigation system helps keep your home safe longer. Proper care and attention reduce the risk of system failure. It also saves money on repairs and replacements. Simple actions can make a big difference over time.
Proper System Usage
Use your radon mitigation system as the manufacturer directs. Avoid blocking vents or pipes. Keep the system running continuously unless instructed otherwise. Check for unusual noises or smells regularly. Turn off the system only during maintenance or emergencies. Proper usage prevents damage and keeps the system effective.
Upgrading System Components
Replace worn or outdated parts promptly. Some components wear out faster than others. Fans and seals may need regular upgrading. Use parts recommended by the system’s manufacturer. Upgrading improves efficiency and extends the system’s life. Keep a maintenance log to track changes and repairs.
Credit: www.johnnyenviro.com
Frequently Asked Questions
How Often Should Radon Mitigation Systems Be Inspected?
Radon mitigation systems should be inspected annually to ensure proper function. Regular checks prevent system failures and maintain low radon levels.
What Maintenance Does A Radon Mitigation System Require?
Maintenance involves checking the fan operation, sealing cracks, and ensuring vent pipes are intact. These steps keep radon levels safely low.
Can I Perform Radon System Maintenance Myself?
Basic inspections can be done by homeowners, but professional maintenance is recommended. Experts ensure thorough system checks and repairs.
How Do I Know If My Radon System Needs Repair?
Signs include increased radon levels or unusual noises from the fan. Prompt repair keeps your home safe and radon-free.
Conclusion
Radon mitigation systems need regular checks to work well. Keep an eye on the fan and pipes for any damage. Clean or replace parts as needed to keep radon low. A well-maintained system protects your home and health. Don’t wait for problems—take action early.
Small efforts now save big troubles later. Stay safe and breathe easy with simple upkeep.


