Can Budget 4K Monitors Handle Content Creation?
Do budget 4K monitors work for content creation? The short answer is yes, but only when you understand what you're giving up. A budget 4K monitor delivers sharp resolution and a large workspace for under $500.
It skips factory calibration, true HDR, and panel uniformity guarantees. You accept those limits and buy a colorimeter instead.
Our research across manufacturer spec sheets and thousands of buyer reviews shows the same pattern. Budget panels ship with Delta E values of 3 to 6, which means skin tones and smooth gradients look slightly off. A $200 calibration device fixes most of that.
The monitor is only half the real investment.
Quick Answer: Can a Budget 4K Monitor Handle Real Content Creation?
Yes, for most content creation work. Budget 4K monitors deliver sharp images and a spacious canvas for under $500. They fall short on out-of-the-box color accuracy and real HDR.
A $200 colorimeter closes most of that gap. That makes them a legitimate option for photo and video editing.
The nuance is in the workflow. If you edit YouTube videos, retouch family photos, or design social media graphics, a budget 4K monitor is genuinely fine. If you color-grade films for broadcast or proof client print work, you'll want something better.
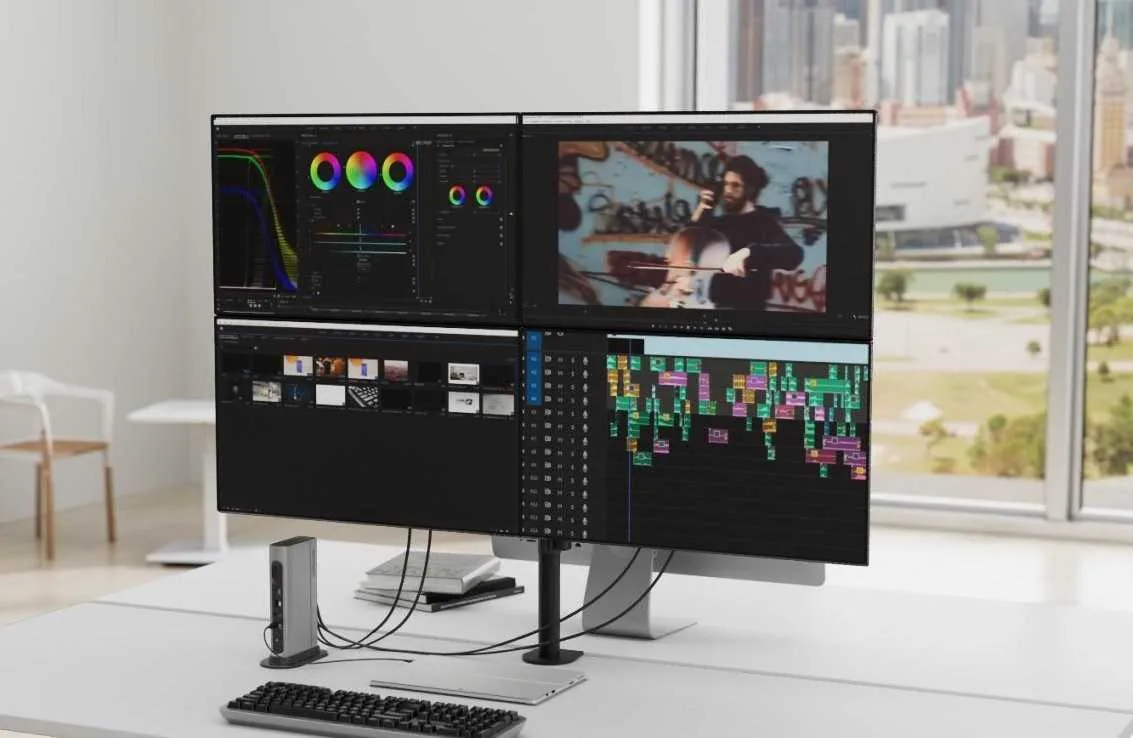
The sweet spot for most creators is a 27-inch or 32-inch IPS panel in the $300 to $450 range. At that price, you get enough pixels to inspect fine detail at 100% zoom and enough screen space to keep your timeline, panels, and preview window open at once.
What you're really paying for at the budget level is resolution and desk real estate, not color engineering. Once you accept that, the buying decision gets simpler.
What "Budget 4K" Actually Means: Price, Panels, and Specs
A budget 4K monitor is any 3840 × 2160 display under $500, and most serious options land between $250 and $450. At that price, you're getting a 27-inch or 32-inch IPS panel running at 60Hz. No local dimming, no factory color report, no hardware LUT support.
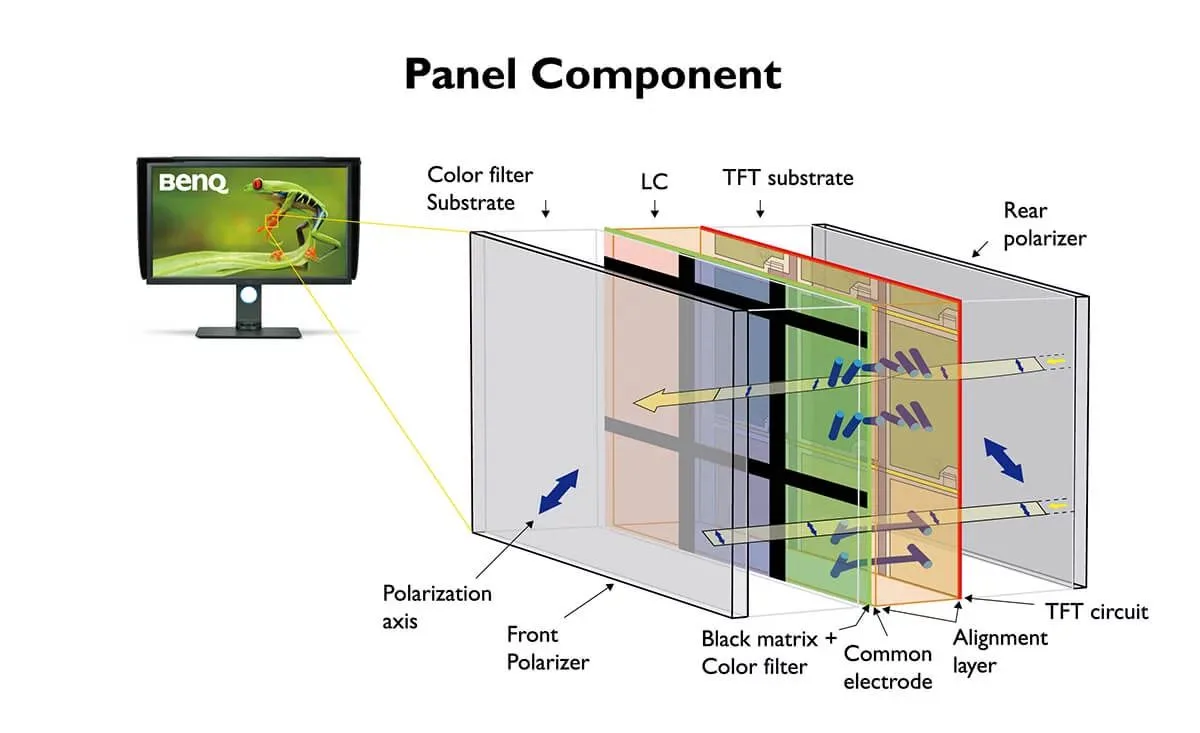
Panel technology matters most. Nearly every professional display uses In-Plane Switching (IPS) because it holds color at wide viewing angles. Most budget 4K monitors use IPS too.
Some cheaper models go with Vertical Alignment (VA) panels, which offer deeper blacks but shift color when viewed off-angle.
Bit depth quietly separates price tiers. True 10-bit panels show over a billion colors but cost more to make. Budget panels almost always use 8-bit + FRC (Frame Rate Control), which dithers between shades to fake 10-bit output.
Color banding shows up in smooth gradients like skies and sunsets.
| Spec | Typical Budget 4K Value |
|---|---|
| Resolution | 3840 × 2160 (UHD) |
| Refresh rate | 60Hz |
| Panel type | IPS (most common) or VA |
| Color gamut | 100% sRGB, 80–90% DCI-P3 |
| Bit depth | 8-bit + FRC |
| Brightness | 250–350 nits |
| HDR support | DisplayHDR 400 |
| Connectivity | DisplayPort 1.4, HDMI 2.0/2.1, USB-C (often with power delivery) |
Manufacturer specifications in this range look similar across brands. Most claim the same sRGB coverage, the same brightness, and the same 60Hz refresh. The catch is that these numbers describe the panel's potential, not what ships in the box.
Out-of-the-box Delta E readings of 3 to 6 are common.
Where Budget 4K Monitors Shine: Practical Creative Use Cases
Budget 4K monitors earn their keep in any workflow where resolution matters more than perfect color. That includes video editing, photo retouching, graphic design, and digital illustration. The shared trait is that the work lives on screen rather than on a physical print.
Video editing is the strongest use case. A 4K timeline at 100% zoom needs serious pixel density, and a budget 27-inch panel delivers exactly that. You can inspect focus in footage, check fine detail, and keep a full timeline visible without shrinking the preview window.
Editors working in DaVinci Resolve, Premiere Pro, or Final Cut will feel the difference immediately.
Photo retouching benefits just as much. When you're working on a portrait at 100% zoom, the gap between 1080p and 4K is huge. A budget 4K monitor shows you all the detail you're actually editing, which makes cloning, healing, and masking more precise.
Graphic designers and social media managers get an easier time too. Most client work lives in sRGB color space, which budget 4K monitors cover well. A 32-inch model gives you room for a website mockup, a social post draft, and a reference window all at once.
Best fits for a budget 4K monitor:
- YouTube video editing in Premiere Pro or DaVinci Resolve
- Lightroom and Photoshop retouching
- Social media design and marketing assets
- Coding and data visualization
- Mixed office work with occasional creative tasks
Skip it for:
- Final color grading for broadcast or cinema
- Client-facing print proofing
- HDR video mastering
The Hard Limits: Color Accuracy, HDR, and Build Quality at $300
No amount of good intentions turns a $300 panel into a reference monitor. The limits are baked into the hardware, and understanding them is the difference between a smart purchase and a frustrating one.
Color accuracy is the biggest compromise. Most budget 4K monitors cover 100% of the sRGB color space, but sRGB is the smallest working color space in modern content creation. They typically hit only 80 to 90% of DCI-P3, which matters for video editing.
Adobe RGB coverage drops even lower, which is a problem for print work.
HDR on budget monitors is mostly a marketing checkbox. The VESA DisplayHDR 400 certification means the panel can hit 400 nits of brightness and accept an HDR signal. It doesn't mean you'll get meaningful contrast, deep blacks, or highlight detail.
Real HDR grading needs DisplayHDR 1000 or OLED, both of which live far above budget prices.
Backlight bleed and IPS glow are part of the budget experience. Light leaks around the edges on dark scenes. A slight haze appears when viewing off-center.
These aren't fixable with software, and every budget model has some degree of both.
There's also the panel lottery. Two identical monitors from the same brand can ship with noticeably different uniformity and color tint. One unit might look great while its twin has a warm cast in the corner.
That's why buying from a retailer with a generous return policy matters as much as reading spec sheets. As of 2026, most budget 4K monitors still ship with Delta E values between 3 and 6.
Budget 4K vs. Professional Displays: The Specs That Actually Matter
The spec sheets of a $350 monitor and a $1,500 monitor look surprisingly similar, but the differences that matter hide in the details. Both are 4K. Both use IPS panels. Both claim wide color coverage.
The gaps live in calibration, uniformity, and hardware support.
| Spec | Budget 4K | Professional 4K |
|---|---|---|
| Price | $250–$500 | $800–$5,000+ |
| Out-of-box Delta E | 3–6 | < 2 |
| Bit depth | 8-bit + FRC | True 10-bit |
| Factory calibration | Rarely | Always, with individual report |
| sRGB coverage | ~100% | 100% |
| Adobe RGB coverage | ~70–90% | 97–99% |
| DCI-P3 coverage | 80–90% | 95–99% |
| Hardware LUT support | No | Yes |
| DisplayHDR | 400 | 600 / 1000+ |
| Uniformity guarantee | No | Yes |
Delta E measures how far a displayed color is from the intended color. A Delta E of 2 or below is considered excellent for professional work. Budget monitors ship at 3 to 6, which means skin tones can look slightly too warm or too cool straight out of the box.
Factory calibration is the other big divider. When you buy an ASUS ProArt or BenQ SW series monitor, you get a printed report confirming your exact panel's Delta E across dozens of colors. Budget monitors don't include that.
You provide your own calibration equipment, which adds $150 to $300 to the total cost.
Hardware LUT support is the deepest gap. A hardware lookup table (LUT) stores calibration data directly on the monitor's electronics, so the correction applies to every input device. Software calibration only affects your computer's output.
If you connect a different device to a calibrated budget panel, the correction disappears.
This is why the decision isn't really about resolution. Both tiers deliver the same pixels. It's about whether you need verified color accuracy, consistent uniformity, and hardware-level corrections.
Most solo creators don't. Production houses and commercial studios do.
Budget 4K vs. Mid-Range 1440p: A Smarter Alternative?
There are two good reasons to skip a budget 4K monitor entirely. The first is color accuracy. A mid-range 1440p display with factory calibration, like the ASUS ProArt PA278QV, delivers Delta E under 2 out of the box for roughly $280. If you work in print or broadcast, that raw accuracy matters more than extra pixels.
The second reason is mixed gaming and creative work. A 1440p high-refresh panel gives you sharp enough text for editing and 144Hz for fast-paced games. Budget 4K tops out at 60Hz, which is fine for static images but not for gaming.
It's also the better match if you run a work and gaming laptop and want one display for both.
But for pure content creation, 4K wins. The extra pixels matter for photo retouching at 100% zoom. They matter for timeline density in video editors.
And they matter for reading fine text without scaling. Calibrate a 1440p display and you have accurate color at lower resolution. Calibrate a budget 4K display and you get accuracy plus real resolution.
That's the better long-term investment for creative work.
Why Calibration Is the Real Game-Changer
A $200 colorimeter can turn a $350 monitor into a display that behaves like one costing three times as much. In our research, calibrated budget panels routinely land at Delta E 2 or below, which is the professional accuracy threshold. That's the single biggest value unlock in this category.
Calibration measures your specific panel's output and builds an ICC profile that corrects its weaknesses. The International Color Consortium (ICC) manages the ICC profile standard. It's the same framework used in print shops, broadcast suites, and photography studios.
Hardware calibration beats software eyeballing every time. A colorimeter like the Datacolor Spyder X2 or X-Rite i1Display Pro reads actual color output. Then DisplayCAL, a free open-source tool, turns those readings into a correction profile.
Budget monitors lack factory reports, so this step matters more than on a pro display.
How hard is it to calibrate a monitor yourself?
It's easier than most people expect. The software walks you through each step, and the whole process takes about 20 minutes. Recalibrate every two to four weeks to keep colors consistent as the panel ages.
The Hidden Costs: Colorimeter, Cables, and Desk Space
The monitor itself isn't the whole budget. A decent colorimeter runs $150 to $300. Cables, mounting, and desk space add more. Plenty of buyers get caught off guard by these extras.
Most budget 4K monitors include a basic HDMI cable. For a clean setup, you'll want a quality DisplayPort 1.4 or USB-C cable that supports 4K at 60Hz. A cheap cable can cause flickering or drop the signal entirely, so buy a certified one.
Desk space is the sneaky cost. A 27-inch panel fits fine on a standard 24-inch-deep desk. A 32-inch model often needs a deeper surface or a monitor arm.
You'll also want height adjustment, since you'll stare at this thing for hours.
If you're running a laptop as your main editing machine, look for a monitor with USB-C power delivery. That gives you a single-cable setup, and you can add a portable side display for palettes and reference images without spending much extra.
The Panel Lottery: Inspecting Your Budget 4K Monitor on Arrival
Budget monitors carry a quality lottery, and two identical models can ship with completely different screens. Backlight bleed, color tint, and dead pixels vary unit to unit. That's why buying from a retailer with a generous return window is the cheapest protection you can get.
Run quick tests before mounting. Display a solid color screen and check for dead pixels. Look for backlight bleed on a black screen.
IPS glow appears as a hazy sheen from the corners when viewing at an angle. Every IPS panel has some, but severity varies wildly.
Pixel defects matter more for editors than for gamers. A single stuck pixel in the middle of your workspace ruins a retouching session. Check both solid colors and a full-screen photo in your actual editing software before you commit.
Calibration Step-by-Step: Closing the Gap Without Spending Big
You don't need a lab to get professional-level color from a budget 4K monitor. You need the right tools and a repeatable workflow. Here's the process that works.
- Set the monitor to its sRGB mode or a neutral preset in the On-Screen Display (OSD) menu.
- Let the display warm up for 15 to 30 minutes.
- Aim for a comfortable working brightness of 120 to 160 cd/m².
- Connect your colorimeter, like the Datacolor Spyder X2 or X-Rite i1Display Pro.
- Run DisplayCAL and follow the guided calibration process.
- Save the resulting ICC profile and set it as your system default.
After calibration, run the verification step. Most budget panels land between Delta E 1 and 2 once profiled. Aim for under 2.0 before you trust the screen for color-critical work.
Your editing software matters too. Photoshop and Lightroom respect ICC profiles automatically. Premiere Pro and DaVinci Resolve need their color management settings configured to actually use that profile.
Skipping that step undoes all your work.
Mistakes to Avoid When Buying a Budget 4K Monitor
The biggest mistake is buying a high-refresh gaming panel instead of a color-focused editing display. A 144Hz 4K monitor looks excellent for shooters, but it often sacrifices color accuracy for speed. For content creation, sRGB coverage and calibration potential matter far more than frame rate.
Choosing a VA panel without knowing the trade-off is another common error. VA screens shift color when viewed off-angle, which makes confident color grading risky unless you sit perfectly centered. IPS remains the safer choice for creative work.
Expecting real HDR from a DisplayHDR 400 badge is a classic letdown. VESA's certification at this tier only confirms the panel can hit 400 nits and accept an HDR signal. It doesn't deliver meaningful contrast or highlight detail, so don't pay extra for it.
Skipping the return policy check is the final trap. Budget monitors have enough unit-to-unit variation that you want at least a 30-day return window. And since monitor pricing follows the same seasonal retail rhythm as TVs, timing your purchase around major sale events saves real money.
Signs You Should Spend More: When Budget Is the Wrong Move
Budget 4K monitors hit their limit when the work itself demands verified precision. If a client is signing off on print deliverables or broadcast masters, you need factory-calibrated accuracy and a uniformity guarantee. A panel lottery at $350 is a risk you can't take on a commercial deadline.
You should also step up if you work in Adobe RGB or DCI-P3 all day. Budget panels typically cover only 80 to 90 percent of those color spaces. Colors outside that range get clipped, so what you design is not what the client sees on their own display.
If you're upgrading a home workspace, a budget 4K monitor pairs beautifully with a solid work-from-home laptop. But if your entire income depends on flawless color, spend the extra on a professional-grade display. The price gap is real, and so is the quality gap.
Real-World Scenarios: What a Budget 4K Monitor Can and Can't Do
Scenario one is a YouTube editor cutting weekly videos. A budget 4K IPS panel at 27 inches gives them pixel-level focus inspection and timeline space. After calibration, skin tones look natural in the final export. This setup genuinely works.
Scenario two is a wedding photographer delivering 300 edited images per album. In Lightroom, the 4K resolution means they check focus at 100% zoom without constant panning. But if a client requests fine art prints, the panel's limited Adobe RGB coverage becomes a real constraint.
Scenario three is a freelance graphic designer working on social media content. Here a budget 4K monitor is nearly perfect. Clients view work on their own business smartphones and laptops anyway, so sRGB coverage is enough. The sharpness becomes the main selling point.
Scenario four is an aspiring colorist training for professional work. A budget monitor works for learning the toolset and building an eye. But final grades on paid projects need a display covering DCI-P3 with hardware LUT support and uniform brightness across the full panel.
FAQs: Color Accuracy, Mac Scaling, and Longevity
Can a budget 4K monitor handle professional photo editing?
Yes, if you calibrate it first. A colorimeter like the Datacolor Spyder X2 plus DisplayCAL software brings most budget panels to Delta E under 2. That's the industry-accepted accuracy threshold.
Just don't expect hardware LUT support or panel uniformity guarantees at this price.
Do budget 4K monitors work well with Mac scaling?
Yes, with one caveat. Look for a model with USB-C and power delivery for a clean one-cable MacBook setup. Some budget panels have imperfect scaling in "looks like 1080p" mode.
Check user reviews for Mac-specific complaints before you buy.
How long do budget 4K monitors last?
Most budget panels are rated for at least 30,000 hours. That's about ten years at eight hours a day. Backlight brightness gradually dims over time.
Users report noticeable color drift after three to five years, which is expected at this price point.
Do I really need a colorimeter for a budget 4K monitor?
If you do any color-sensitive work, yes. Out-of-the-box Delta E readings of 3 to 6 mean your edits are saved with inaccurate colors. The screen might look fine to you, but the final file will look off on other devices.
A $150 colorimeter pays for itself on the first client project.
Final Verdict: Should You Buy a Budget 4K Monitor?
Buy a budget 4K monitor if you need resolution and working space more than factory-perfect color. It's the right call for most YouTubers, social media designers, and photographers editing for web. Just add $150 to your budget for a colorimeter.
Used professional displays change the calculation. A used BenQ, ASUS ProArt, or Dell UltraSharp can cost the same as a new budget 4K panel while delivering factory-calibrated color. The trade-off is risk.
Professional monitors are often sold after heavy daily studio use, so buy from a seller who provides the original calibration report.
Budget 4K monitors don't compete with professional reference displays. That's the wrong question to ask. The right question is whether they beat your current screen.
A calibrated $350 4K IPS display beats an uncalibrated 1080p office monitor in every meaningful way.
For solo creators, freelancers, and students, the answer is a confident yes. Do budget 4K monitors work for content creation? They do, with calibration, managed expectations, and a clear understanding of where their limits lie.
For most creators, a calibrated budget 4K display still delivers the best balance of cost and capability. It gets you 90% of the professional experience for roughly 20% of the price. And once you see your work on a properly calibrated 4K panel, there's no going back.