How to Replace a Heat Only Basic Electronic Home Thermostat: Easy DIY Guide
Is your home feeling a bit too chilly, or perhaps it’s heating up more than you’d like? It might be time to replace your basic electronic home thermostat.
Whether you’re looking to save on energy bills or simply want to enjoy a more comfortable living space, knowing how to replace your thermostat can make a big difference. Imagine the satisfaction of having complete control over your home’s temperature with just a few simple steps.
You don’t need to be an expert to do this; with a little guidance, you can tackle it yourself. This guide will walk you through the process, offering clear instructions and helpful tips to ensure you get it right the first time. Ready to dive in and take control of your comfort? Let’s get started!

Credit: www.reddit.com
Tools And Materials Needed
Replacing a heat-only basic electronic thermostat requires having the right tools and materials. Gathering these items before starting helps the process go smoothly. Knowing what fits your system and what keeps you safe is important.
Thermostat Models Compatible
Choose a thermostat designed for heat-only systems. Most basic electronic thermostats work with single-stage heating. Look for models labeled as compatible with your heating type. Check the wiring requirements match your home’s setup. Popular brands often list compatibility on the packaging or website. Confirm the thermostat supports the voltage of your heating system.
Essential Tools List
- Flathead screwdriver for removing cover plates
- Phillips screwdriver for mounting screws
- Wire stripper for preparing wires
- Voltage tester to check power status
- Drill with bits for new mounting holes
- Level to ensure the thermostat is straight
- Small flashlight for better visibility
- Electrical tape for securing wire connections
Safety Equipment
- Insulated gloves to protect against electric shock
- Safety glasses to guard your eyes
- Dust mask if drilling into walls
- Non-conductive ladder if needed

Credit: diy.stackexchange.com
Preparing For Replacement
Preparing to replace your heat-only basic electronic home thermostat sets the stage for a smooth and safe upgrade. Taking the right steps before you touch any wires or screws can save you time and prevent costly mistakes. Let’s break down how to get ready efficiently and confidently.
Turning Off Power
Before you start, make sure you turn off the power to your heating system at the circuit breaker. This step is crucial to avoid electrical shocks or damaging your thermostat. Double-check that the system is completely off by trying to adjust the thermostat—no response means you’re safe to proceed.
Removing Old Thermostat
Once the power is off, carefully remove the thermostat cover. Some models snap off, while others may require a screwdriver. Take your time to avoid breaking any parts, especially if you want to reuse the mounting plate or cover later.
Labeling Wires
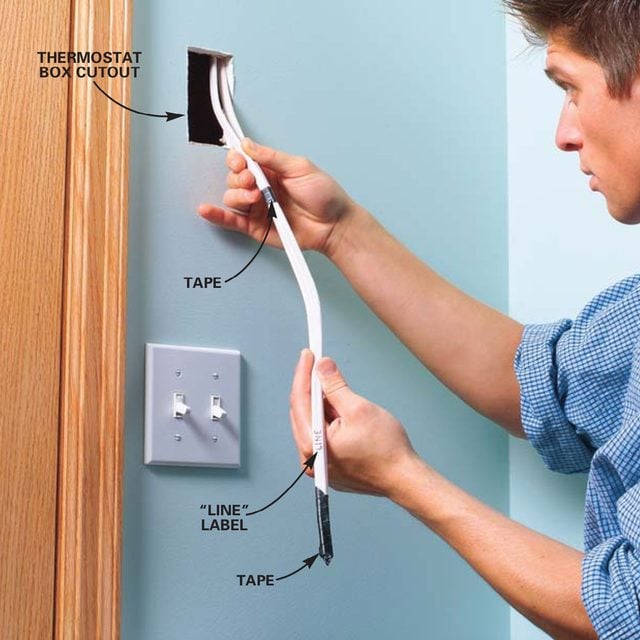
As you disconnect the wires, label each one with masking tape and a pen. This simple step prevents confusion during installation and ensures you connect the new thermostat correctly. If you skip this, you might spend extra time troubleshooting or risk wiring errors that affect your heating system’s performance.
Installing The New Thermostat
Installing your new heat-only basic electronic thermostat is a straightforward task that can save you money and improve your home’s comfort. It involves a few careful steps to ensure everything works perfectly. Let’s walk through the process of mounting the base, connecting the wires, and attaching the faceplate.
Mounting The Base
Start by securing the thermostat base to the wall. Align it with the existing mounting holes or use a level to make sure it’s straight. If the old holes don’t match, drill new ones carefully to avoid damaging the wall.
Use the screws provided with your thermostat to fasten the base firmly. Make sure it sits flush against the wall to prevent any gaps that could affect temperature readings. Have you noticed how a crooked thermostat can make you doubt if it’s working right?
Connecting The Wires
Next, identify the wires coming from your heating system. Typically, a heat-only thermostat has just two wires: one for power and one for the heating control. Double-check that the power is off before you touch any wires to stay safe.
Attach each wire to the corresponding terminal on the thermostat base. Usually, these terminals are labeled clearly, but if not, refer to the instruction manual or mark the wires before disconnecting the old thermostat. A loose wire here can mean your heater won’t turn on, so make sure they’re firmly connected.
Attaching The Faceplate
Once the wiring is secure, snap the thermostat’s faceplate onto the base. This part usually clicks into place easily, but don’t force it. If it doesn’t fit smoothly, check the wires aren’t in the way or the base isn’t mounted evenly.
After the faceplate is attached, restore power and test your new thermostat. Adjust the temperature settings and listen for your heating system to kick in. If something feels off, it’s worth double-checking your connections before assuming the thermostat is faulty.
Credit: www.familyhandyman.com
Configuring The Thermostat Settings
Configuring the thermostat settings is essential for proper heating control. It ensures comfort and energy efficiency in your home. Setting up the date, time, and temperature controls helps the system work correctly. Testing the system confirms everything functions as expected. Follow these steps to configure your basic electronic home thermostat.
Setting The Date And Time
Begin by powering on the thermostat. Locate the buttons or touchscreen for date and time settings. Use the arrow keys to adjust the day, month, and year. Set the correct hour and minutes. Confirm each entry by pressing the OK or Set button. Accurate date and time help the thermostat follow heating schedules properly.
Adjusting Temperature Controls
Find the temperature adjustment buttons or dial. Set the desired temperature for your home’s comfort. Adjust the heating setpoint to match your needs during the day and night. Some thermostats allow separate settings for weekdays and weekends. Use these options to save energy while maintaining warmth. Keep temperature changes small for better energy use.
Testing The System
After configuring, test the heating system to ensure it works. Increase the temperature setting above the current room temperature. Wait for the heating system to activate. Listen for the furnace or heater turning on. Check if warm air or heat starts flowing. Lower the temperature setting to turn off the system. This confirms the thermostat controls the heating correctly.
Troubleshooting Common Issues
Troubleshooting your basic electronic home thermostat can save you time and money before deciding to replace it entirely. Many common issues have simple fixes that don’t require professional help. Understanding these problems helps you keep your heating system running smoothly, especially during cold days.
No Power To Thermostat
If your thermostat screen is blank, the first thing to check is whether it’s receiving power. Often, a tripped circuit breaker or a blown fuse in your home’s electrical panel can cut power to the thermostat.
Check the following:
- Is the thermostat properly connected to its power source? Loose wires can cause disconnection.
- Does your thermostat use batteries? Replace them even if they seem fine.
- Inspect the circuit breaker and reset if necessary.
Have you ever found a simple loose wire causing hours of frustration? It’s a common oversight that’s easy to miss but quick to fix.
Incorrect Temperature Reading
If your thermostat shows a temperature different from the room’s actual temperature, it can misguide your heating system. This usually happens if the thermostat is placed near heat sources, drafts, or direct sunlight.
Try these tips:
- Move the thermostat to a central wall away from windows, vents, or lamps.
- Clean the thermostat sensors gently to remove dust buildup.
- Calibrate the thermostat if your model allows it; consult the manual for instructions.
Think about where you installed your thermostat. Could it be sensing heat from a nearby lamp instead of the room? Small adjustments can improve accuracy significantly.
Heating System Not Responding
Sometimes the thermostat displays the correct settings, but the heating system doesn’t turn on. This issue often points to wiring problems or a malfunction within the heating unit itself.
Check these points carefully:
- Ensure all thermostat wires are securely connected and free from damage.
- Verify the heating system’s power supply and reset the system if needed.
- Test the thermostat by increasing the temperature setting above the room temperature to see if the heater activates.
Have you noticed that your heater won’t turn on even after adjusting the thermostat? Sometimes the problem lies in the relay or control board inside the heater, which may need professional inspection.
Maintenance Tips For Longevity
Proper maintenance helps your basic electronic thermostat work longer and better. Small care steps keep it accurate and avoid costly repairs. Regular attention improves comfort and saves energy.
Regular Cleaning
Dust and dirt can block the thermostat’s sensors. Use a soft cloth or small brush to clean it gently. Avoid water or spray cleaners near the device. Keep the area around the thermostat free from dust and debris.
Battery Replacement
Replace batteries once a year or when the display dims. Use fresh, high-quality batteries for reliable performance. Low batteries cause errors and reduce thermostat response. Always check the battery type before buying replacements.
Seasonal Checks
Check the thermostat before winter and summer seasons. Make sure it controls the heating system correctly. Test all buttons and settings to confirm they work well. Look for any signs of damage or wear and fix them quickly.
Frequently Asked Questions
What Tools Do I Need To Replace A Heat-only Thermostat?
You will need a screwdriver, voltage tester, wire stripper, and the new thermostat. Always turn off power before starting. These tools ensure safe and accurate installation.
How Do I Safely Turn Off Power To My Thermostat?
Locate your home’s circuit breaker panel and switch off the breaker controlling your heating system. Use a voltage tester to confirm power is off before proceeding.
Can I Reuse Old Wiring When Installing A New Thermostat?
Yes, usually the existing wiring can be reused. Label wires before disconnecting to match terminals on the new thermostat. This saves time and avoids wiring mistakes.
How Do I Mount The New Electronic Thermostat Correctly?
Attach the mounting plate to the wall using screws and anchors. Make sure it is level and secure. Then connect wires following the manufacturer’s instructions for proper function.
Conclusion
Replacing a basic electronic home thermostat is simple and safe. Follow each step carefully and take your time. Double-check your work before turning the power back on. A new thermostat helps you control your home’s heat better. It saves energy and keeps you comfortable.
You don’t need to call a professional for this task. Just use the right tools and instructions. Now, enjoy a warmer home with your new thermostat installed.