How to Start Electronic Projects Diy: Easy Steps for Beginners
Are you curious about diving into the world of electronics and crafting your own gadgets? Starting DIY electronic projects can be an incredibly rewarding and fun experience.
Imagine the thrill of creating something from scratch that lights up, moves, or even makes sounds! Whether you’re a complete beginner or have some experience, this guide will walk you through the essentials of getting started. You’ll discover the tools you need, the skills to master, and the first steps to take in this fascinating hobby.
Get ready to unlock your creativity and bring your electronic ideas to life! Keep reading to find out how you can transform simple components into amazing projects that you can be proud of.
Choosing Your First Project
Choosing your first electronic project sets the tone for your learning experience. It should match your skill level and keep you motivated. Starting with simple projects builds confidence and helps you understand basic concepts clearly. This approach reduces frustration and makes learning fun. You will gain practical skills by working on manageable tasks. Let’s explore some easy projects and the tools you need to begin.
Simple Projects For Beginners
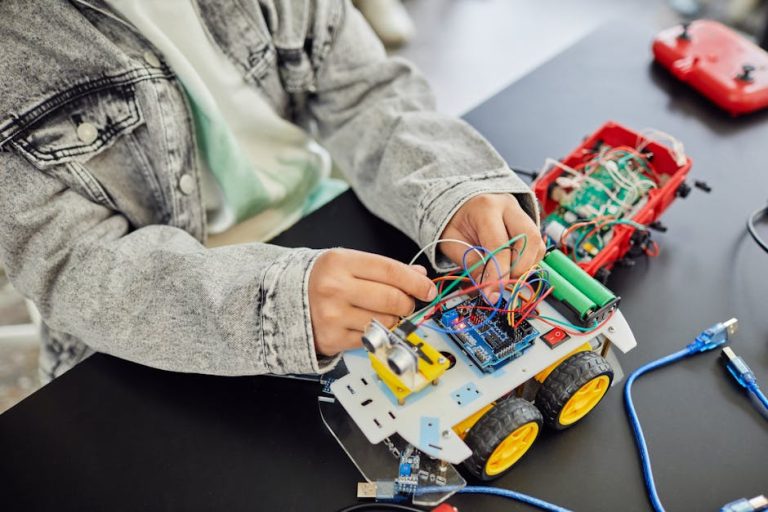
Begin with projects that use basic components and simple circuits. These projects teach you how to read schematics and connect parts. Examples include:
- LED blink circuit
- Basic light sensor
- Simple buzzer alarm
- Battery tester
These projects need few parts and help you learn soldering and wiring. Completing them gives a sense of achievement. Gradually, you can try more complex tasks.
Tools And Materials Needed
Having the right tools makes your work easier and safer. Start with essential items that work for most beginner projects:
- Soldering iron and solder wire
- Breadboard for testing circuits
- Wire cutters and strippers
- Multimeter for measuring voltage and current
- Basic electronic components like resistors, LEDs, and capacitors
These tools and parts form the foundation of your electronics kit. Quality tools improve your project results and help you learn faster.
Basic Electronics Components
Starting electronic projects requires knowing the basic parts. These parts connect and work together to build circuits. Understanding each component helps you create and fix projects easily. Basic components include resistors, capacitors, LEDs, microcontrollers, and sensors. Each has a simple job but is very important.
Resistors
Resistors control the flow of electric current in a circuit. They stop too much current from damaging parts. Resistors come in many sizes and strengths. The value of a resistor tells how much it resists current. You can identify this value by colored bands on the resistor. Resistors are easy to use and find in any electronic kit.
Capacitors
Capacitors store and release electrical energy quickly. They help smooth out power supply changes in circuits. Capacitors come in different shapes and sizes. Some look like small cans, others as tiny chips. Their value is measured in farads, but most beginner kits use microfarads or picofarads. Capacitors are useful for timing and filtering signals.
Leds
LEDs are small lights that show if power flows in a circuit. They come in many colors and sizes. LEDs use very little electricity and last a long time. A resistor is needed with LEDs to protect them from too much current. They are great for visual feedback in projects, like indicating power or signals.
Microcontrollers And Sensors
Microcontrollers are tiny computers that control your project. They read input from sensors and control outputs like motors or lights. Popular microcontrollers include Arduino and Raspberry Pi. Sensors detect environmental data like light, temperature, or motion. Connecting sensors to microcontrollers makes projects smart and interactive. Learning to program microcontrollers is key for advanced DIY electronics.
Setting Up Your Workspace
Creating a dedicated workspace is key for successful DIY electronic projects. It helps you stay organized and focused. A neat, well-lit area reduces mistakes and saves time.
Pick a quiet spot with plenty of room for your tools and components. A flat surface like a sturdy table works best. Good lighting, natural or artificial, protects your eyes and improves precision.
Essential Tools For Diy Electronics
- Soldering iron with adjustable temperature
- Wire cutters and strippers
- Multimeter to measure voltage and resistance
- Helping hands or a small vise to hold parts
- Precision screwdrivers and tweezers
- Breadboard for circuit prototyping
- Assorted jumper wires and connectors
- Storage boxes for small components
Safety Tips And Precautions
- Always work in a well-ventilated area
- Wear safety glasses to protect your eyes
- Keep liquids away from electronic parts
- Turn off power before making circuit changes
- Use a fire-resistant mat under your workspace
- Handle soldering iron carefully; it gets very hot
- Store sharp tools safely when not in use
- Dispose of electronic waste properly
Reading Circuit Diagrams
Reading circuit diagrams is a key skill for DIY electronic projects. These diagrams show how components connect in a circuit. Learning to read them helps you build and troubleshoot circuits accurately. Understanding the symbols and flow makes the process easier and more fun.
Common Symbols And Their Meanings
Every circuit diagram uses symbols for components. Knowing these symbols saves time and avoids mistakes. Here are some common ones:
- Resistor:A zigzag line, controls current flow.
- Capacitor:Two parallel lines, stores electric charge.
- Battery:Long and short parallel lines, power source.
- Diode:A triangle pointing to a line, allows current one way.
- Ground:A set of descending lines, circuit’s reference point.
- Switch:A break in a line, opens or closes the circuit.
- LED:Like a diode with arrows, lights up when current passes.
Recognizing these symbols helps you visualize the circuit’s structure quickly.
Following A Schematic Step-by-step
Start at the power source. Trace wires from the battery or power supply. Follow the path to each component in the order current flows.
Look for connections and junctions where wires meet. Check if switches are open or closed. Note component values like resistance or capacitance.
Break the diagram into smaller parts. Understand each section before moving on. This approach makes complex circuits easier to handle.
Use a ruler or finger to track lines. This reduces confusion between crossing wires. Take notes on what each part does as you go.
Practice by building simple circuits from diagrams. This strengthens your reading skills and confidence.
Building Your Circuit
Building your circuit is a key part of any electronic project. It brings your ideas to life by connecting all components correctly. This stage requires care and patience to avoid errors. Proper circuit building ensures your project works as expected and lasts longer.
Breadboarding Techniques
Breadboarding lets you test circuits without soldering. Use a breadboard to place components and wires easily. It helps find mistakes before final assembly.
- Insert components firmly into the breadboard holes.
- Use jumper wires to connect parts across rows and columns.
- Keep wires short and organized for clarity.
- Check connections twice to avoid loose contacts.
- Refer to your circuit diagram often during setup.
This method saves time and allows quick changes. It is ideal for beginners and complex circuits alike.
Soldering Basics
Soldering joins components permanently to a circuit board. It needs a soldering iron, solder wire, and steady hands. Proper soldering improves circuit durability and reliability.
- Heat the joint before applying solder.
- Use just enough solder to cover the connection.
- Avoid cold joints by keeping the iron steady.
- Let the solder cool without moving the parts.
- Trim excess wire after soldering.
Practice on spare wires before working on your project. Clean the soldering tip regularly for better heat transfer. Good soldering creates neat, strong joints that last.
Testing And Troubleshooting
Testing and troubleshooting are essential parts of any DIY electronic project. They help find mistakes and ensure everything works properly. Careful testing saves time and prevents damage to parts. Troubleshooting helps fix problems quickly and keeps the project on track.
Using Multimeters And Testers
Multimeters measure voltage, current, and resistance in circuits. They help check if parts work correctly. Use the multimeter probes to touch two points in the circuit. The screen shows the reading. This tells if a wire or component is good or broken.
Testers are simpler tools that check power or signal presence. They light up or beep when the circuit is live. Use testers to find open circuits or bad connections fast.
- Set the multimeter to the correct mode before testing.
- Test batteries and power supplies first.
- Check resistors and capacitors for proper values.
- Look for short circuits by measuring resistance.
Common Issues And Fixes
Many problems happen in DIY electronics. Loose wires often cause no power or signal. Tighten or resolder connections to fix this. Wrong part values lead to wrong outputs. Double-check component numbers and replace if needed.
Short circuits may cause heating or no function. Inspect the board for solder bridges or touching parts. Use a multimeter to find shorts between power and ground.
Burnt parts show dark spots or smell bad. Replace burnt components and test again. Faulty switches or buttons stop input signals. Clean or swap them to solve the issue.
| Issue | Cause | Fix |
|---|---|---|
| No power | Loose wires, dead battery | Check and reconnect wires, replace battery |
| No signal | Broken component, bad solder | Replace part, resolder joints |
| Short circuit | Solder bridge, touching wires | Remove bridge, separate wires |
| Burnt component | Overload, wrong part | Replace component, check circuit design |
Expanding Your Skills
Expanding your skills in DIY electronic projects opens new doors. It helps you build more complex and exciting devices. Learning new techniques and tools keeps your work fresh and rewarding.
Programming Microcontrollers
Microcontrollers are small computers inside electronics. Programming them allows you to control devices and create smart projects. Start with simple boards like Arduino or Raspberry Pi Pico.
Learn basic coding languages such as C or Python. These are common in electronics programming. Use free online tutorials to practice and build confidence. Experiment with small programs to see how your device reacts.
Joining Online Communities
Online communities connect you with other DIY electronics enthusiasts. They offer support, advice, and project ideas. Find forums, social media groups, and websites focused on electronics.
- Ask questions and share your progress.
- Learn from others’ experiences.
- Access free resources and tutorials.
Being part of a community boosts motivation and helps solve problems faster. Collaboration often leads to better and more creative projects.
Frequently Asked Questions
What Basic Tools Are Needed For Diy Electronic Projects?
Basic tools include a soldering iron, wire cutters, multimeter, screwdriver set, and breadboard. These tools help you assemble and test circuits effectively.
How Do Beginners Start Simple Electronic Projects?
Start with easy kits like LED blinkers or basic sensors. Follow step-by-step guides to understand circuit components and connections clearly.
Where Can I Find Electronic Project Ideas For Beginners?
Websites like Instructables, Hackster. io, and YouTube offer many beginner-friendly project ideas with detailed instructions and videos.
What Safety Precautions Should I Take In Electronic Diy Projects?
Always unplug power before working on circuits. Use insulated tools and work in a dry, well-lit area to avoid accidents.
Conclusion
Starting electronic projects DIY can be simple and fun. Choose easy projects first to build skills. Gather basic tools and parts before you begin. Follow clear instructions step by step. Practice often to improve your understanding. Learn from mistakes and keep trying.
Enjoy the process of creating something new. Your confidence will grow with each project. Electronics can open many new hobbies for you. Start small, stay curious, and keep exploring.