
Are you ready to take control of your electronics projects and fix things like a pro? Knowing how to solder and desolder electronic components is a skill that can save you time, money, and frustration.
Whether you’re building your first circuit or repairing a favorite gadget, mastering these techniques puts the power in your hands. In this guide, you’ll discover simple, clear steps that make soldering and desoldering easy—even if you’ve never tried before. Stick with me, and by the end, you’ll feel confident tackling your own electronic repairs and creations.
Let’s get started!

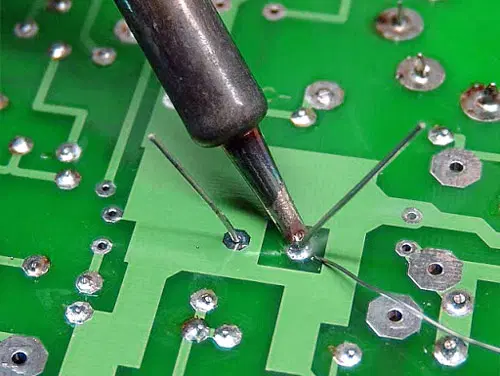
Credit: www.allpcb.com
Essential Tools For Soldering
Soldering and desoldering need the right tools. Good tools make work easier and safer. They help create strong, clean connections on electronic components. Investing in essential tools saves time and avoids frustration.
Soldering Iron Selection
Choose a soldering iron with adjustable temperature control. This helps work on different components safely. Pick irons with comfortable handles to avoid hand fatigue. A fine tip is best for small parts. Look for irons that heat up quickly for efficiency.
Soldering Station Features
A soldering station offers more control than a basic iron. It usually includes a stand and temperature settings. Some stations have digital displays for precise heat adjustment. They provide steady power, improving solder quality. Stations often come with safety features, like automatic shut-off.
Types Of Solder
Solder comes in various types and thicknesses. Lead-free solder is common and safer to use. It melts at a higher temperature but is eco-friendly. Tin-lead solder melts easier and works well for beginners. Choose solder with flux core to clean surfaces while soldering.
Additional Accessories
- Soldering iron stand to hold hot tools safely
- Desoldering pump or wick for removing solder
- Helping hands or clamps to hold parts steady
- Wire cutters and tweezers for precise work
- Safety glasses to protect eyes from splashes
- Heat-resistant mat to protect your workspace
Preparing For Soldering
Preparing for soldering is a key part of any electronics project. Proper preparation helps ensure clean, strong connections and prevents damage to components. It also makes the process safer and more efficient. Taking time to set up your workspace, follow safety rules, and clean parts improves your results greatly.
Workstation Setup
Choose a well-lit, flat surface for your work area. Keep your tools within easy reach to stay organized. Use a heat-resistant mat or pad to protect the surface from hot soldering irons. A small fan or fume extractor helps remove solder smoke from your breathing zone. Arrange components and wires neatly to avoid confusion during soldering.
Safety Precautions
Wear safety glasses to protect your eyes from solder splashes. Work in a ventilated area to avoid inhaling fumes. Keep flammable materials away from your workstation. Use a soldering iron stand to hold the hot iron safely when not in use. Never touch the metal tip of the iron. Wash hands after handling solder to remove harmful residues.
Cleaning The Components
Clean component leads with isopropyl alcohol and a soft cloth. Remove any dirt, grease, or oxidation for better solder flow. Use a small brush or fine sandpaper to gently clean oxidized surfaces. Make sure components are dry before soldering. Clean printed circuit board pads to ensure good electrical contact.
Soldering Techniques
Soldering is a skill that demands precision and care. Mastering the right techniques can make your electronic projects reliable and long-lasting. Let’s dive into key soldering techniques that will help you get perfect joints every time.
Tinning The Tip
Tinning the tip of your soldering iron is essential before you start. It means coating the tip with a thin layer of solder to improve heat transfer. Without tinning, the tip oxidizes quickly and won’t heat components evenly.
Heat the iron, then melt a small amount of solder onto the tip. This creates a shiny, smooth surface that sticks well to the parts you want to solder. If you skip this step, your work will feel frustrating and uneven.
Joint Preparation
Preparing the joint is as important as the soldering itself. Clean both the component lead and the PCB pad with isopropyl alcohol or a fine abrasive. Dirt or oxidation blocks good solder flow and leads to weak connections.
Check the fit of the parts before soldering; they should be snug but not forced. Poor fit can cause cold solder joints, which look dull and crack easily. Ask yourself: have you created a solid base for your solder to bond?
Applying Solder
Touch the soldering iron tip to both the pad and the lead simultaneously. This heats them evenly. Then feed solder into the joint—not the iron tip—until it flows and covers the connection.
Remove the solder first, then the iron, to avoid a blob. The solder should look shiny and smooth, not lumpy or dull. Practice controlling solder flow; too much creates shorts, too little makes weak joints.
Inspecting The Solder Joint
After soldering, inspect your joint carefully. It should have a concave shape and cover both the pad and the lead fully. Any cracks, holes, or dullness are signs of poor soldering.
Use a magnifying glass if needed. You want to catch problems before powering your circuit. What’s one flaw you’ve found in your solder joints that taught you an important lesson?
Common Soldering Mistakes
Soldering is a skill that requires precision and attention to detail. Even a small mistake can cause your electronic project to fail or behave unpredictably. Understanding the common soldering mistakes will help you avoid frustration and improve your results quickly.
Cold Solder Joints
Cold solder joints happen when the solder doesn’t melt properly, leading to weak electrical connections. You might notice a dull or grainy surface instead of a shiny one. This usually occurs if the soldering iron tip isn’t hot enough or if you move the component before the solder cools.
To fix this, make sure your iron reaches the right temperature and hold the joint steady until the solder solidifies. Have you ever finished a circuit only to find it doesn’t work because of invisible cold joints?
Bridging Connections
Bridging connections means solder accidentally connects two or more pads or pins that shouldn’t be connected. This short circuit can cause devices to malfunction or even damage components. It often happens when you use too much solder or the soldering iron tip is too big for the job.
To prevent bridging, use a fine tip and apply solder sparingly. If you spot a bridge, use desoldering braid or a solder sucker to remove the excess solder quickly. How carefully do you check your work before powering your circuit?
Overheating Components
Applying heat for too long can damage sensitive electronic parts, ruining their function permanently. You might see discoloration or even melting on the component or PCB. Overheating happens if you leave the soldering iron on the joint for too long or use a very high temperature.
Try to work efficiently—heat the joint just enough to melt the solder and then remove the iron. Using heat sinks or tweezers to hold the component can also protect it. Have you ever lost a valuable component because of excessive heat?
Desoldering Methods
Removing solder cleanly is just as important as applying it correctly. If you want to replace or fix components on a circuit board without damaging it, mastering desoldering methods is crucial. These techniques help you avoid lifting pads or overheating sensitive parts.
Desoldering Pump Usage
A desoldering pump is a simple, handheld tool that sucks up molten solder. Heat the solder joint with your soldering iron until the solder melts, then quickly place the pump tip over it and press the release button. This action pulls the liquid solder away, leaving the pad clear for component removal.
One tip I learned is to keep the pump’s nozzle close but not touching the iron tip to avoid heat damage. Make sure to clean the pump regularly to maintain strong suction. Have you ever struggled with leftover solder blobs? A pump can save you from tedious cleanup.
Wicking Technique
The wicking method uses a copper braid to soak up excess solder. Lay the braid over the solder joint, press the heated soldering iron on top, and watch the solder flow into the braid’s strands. This is perfect for tight spaces or delicate components where suction tools can be tricky.
Make sure to replace the braid once it’s saturated to avoid poor results. It’s a gentle way to clean joints without applying too much heat for too long. Do you find that sometimes your solder joints look messy? Wicking can help you achieve a cleaner finish.
Hot Air Rework Station
A hot air rework station blows heated air to melt solder evenly around a component’s leads. This method is especially useful for surface-mount devices (SMDs) with many small pins. You can lift the component off the board once the solder softens without applying direct heat with a soldering iron.
Controlling the air temperature and flow is key to avoid damaging nearby parts. I once removed a tiny IC without lifting any pads by using careful hot air technique. Could this be the tool you need for your next complex repair?
Repair And Troubleshooting
Repair and troubleshooting are key skills for working with electronics. They help fix problems and keep devices working well. Knowing how to solder and desolder correctly makes repairs easier and more effective. This section focuses on finding faults, fixing solder joints, and testing after repair.
Identifying Faulty Components
Start by visually inspecting the circuit board. Look for burnt, cracked, or damaged parts. Check for loose connections or broken solder joints. Use a multimeter to test components like resistors, capacitors, and diodes. Identify parts that do not match expected values. This helps pinpoint the exact cause of failure.
Reworking Solder Joints
Reflow cold or cracked solder joints by heating them with a soldering iron. Add a small amount of fresh solder to improve the connection. Remove excess solder that may cause shorts. Use desoldering braid or a pump to clear old solder when needed. Ensure the joint is shiny and smooth after rework. Good joints improve electrical flow and device reliability.
Testing After Repairs
Power up the device carefully after soldering repairs. Use testing tools to check if the circuit works correctly. Verify signals and voltages with a multimeter or oscilloscope. Test the device functions as intended. Monitor for any signs of overheating or abnormal behavior. Proper testing confirms the success of your repair efforts.
Advanced Tips From Experts
Advanced soldering and desoldering require skill beyond the basics. Experts use certain tips to improve quality and safety. These tips help avoid damage and ensure strong connections. Applying these techniques makes your work look professional and last longer.
Temperature Control
Set your soldering iron to the right temperature. Too hot can burn components or circuit boards. Too low makes solder flow poorly, causing weak joints. Experts suggest using a temperature between 300°C and 350°C for most tasks. Use a soldering station with adjustable heat for better control.
Let the iron heat fully before starting. Avoid holding the iron on the joint too long. Quick, steady contact reduces heat damage. Use a temperature gauge to check your iron regularly.
Flux Application
Flux helps solder flow and prevents oxidation. Apply a small amount of flux before soldering. This cleans the metal surfaces and improves adhesion. Experts recommend using rosin-based flux for electronics. Avoid too much flux, as it can cause residue build-up.
Use a flux pen or brush for precise application. Clean off excess flux after soldering to prevent corrosion. A proper flux application makes solder joints shiny and strong.
Handling Sensitive Components
Some components are sensitive to heat and static electricity. Experts handle these parts with care to avoid damage. Use an anti-static wrist strap and mat to protect from static discharge. Keep soldering time short on sensitive parts.
Use heat sinks or tweezers to protect leads from overheating. Allow components to cool naturally after soldering. Handle parts gently and avoid bending pins or leads.

Credit: www.allpcb.com

Credit: www.circuitrework.com
Frequently Asked Questions
What Tools Are Essential For Soldering Electronic Components?
Essential tools include a soldering iron, solder wire, flux, tweezers, and a desoldering pump. Proper tools ensure efficient and clean soldering.
How Do I Safely Desolder A Component From A Circuit Board?
Heat the solder joint with a soldering iron and use a desoldering pump or wick to remove molten solder carefully. Avoid overheating to protect the board.
What Is The Best Solder Type For Electronics?
Lead-free rosin-core solder with a 60/40 tin-lead ratio is ideal. It provides good conductivity and strong, reliable joints.
How Can I Prevent Damage While Soldering Delicate Parts?
Use a low-wattage soldering iron and work quickly. Apply heat only as long as needed to avoid overheating components.
Conclusion
Soldering and desoldering need patience and care. Use the right tools for better results. Practice helps you improve your skills quickly. Always keep safety in mind while working. Clean your work area to avoid mistakes. Check your connections to ensure they hold well.
Small steps lead to successful electronic repairs. Keep learning, and your confidence will grow. Enjoy fixing and building your electronics projects.


