How to Solder Electronic Components Together: Easy Step-by-Step Guide
Are you ready to dive into the fascinating world of soldering and bring your electronic projects to life? Whether you’re a hobbyist or just curious about how to piece together those intricate circuits, learning how to solder electronic components is a skill that can open up endless possibilities.
Imagine the satisfaction of seeing your gadgets work flawlessly because you mastered this essential technique. In this guide, we’ll unravel the secrets of soldering, breaking it down into simple steps that even a beginner can follow. You’ll discover tips and tricks to make your solder joints strong and reliable, turning your DIY dreams into reality.
Keep reading, and by the end of this article, you’ll be equipped with the knowledge to tackle your next project with confidence and precision. Let’s get started!

Credit: www.electronicsandyou.com
Tools And Materials Needed
Soldering electronic components needs specific tools and materials. Using the right items makes the process easier and safer. This section covers the key tools, types of solder, and safety gear you need.
Essential Soldering Tools
- Soldering Iron:The main tool to melt solder and join parts.
- Soldering Iron Stand:Holds the hot iron safely when not in use.
- Wire Cutters:Cut excess component leads and wires cleanly.
- Needle-Nose Pliers:Hold small components or bend leads precisely.
- Desoldering Pump or Wick:Remove solder mistakes or fix connections.
- Helping Hands:A stand with clips to hold parts steady.
- Multimeter:Test electrical connections and check for shorts.
Types Of Solder
Solder is the metal that melts to join parts. Choose solder based on your project and safety needs.
- Lead-Based Solder:Melts easily and flows well, but contains lead.
- Lead-Free Solder:Safer for health, often made from tin, silver, and copper.
- Flux-Core Solder:Contains flux inside to clean surfaces and help solder flow.
- Solid Core Solder:Requires external flux for cleaning joints.
- Thickness:Use 0.7mm to 1mm diameter for most electronics.
Safety Equipment
- Safety Glasses:Protect eyes from solder splashes and fumes.
- Fume Extractor or Fan:Remove harmful smoke from soldering fumes.
- Heat-Resistant Mat:Protect your work surface from hot iron burns.
- Heat-Resistant Gloves:Avoid burns when handling hot tools or parts.
- Proper Ventilation:Work in a well-ventilated area to reduce fumes.
Preparing Components And Workspace
Preparing your components and workspace is the foundation of successful soldering. Without a clean, organized area and properly prepared parts, even the best soldering skills can lead to poor connections. Setting yourself up right saves you frustration and improves your results.
Cleaning Components
Dirty or oily components can prevent solder from sticking properly. Use isopropyl alcohol and a lint-free cloth or brush to wipe the leads and pads before you start. Even a small layer of dust or oxidation can create weak joints that fail over time.
Have you ever noticed a joint that looks fine but quickly falls apart? Cleaning components thoroughly can prevent that. If you’re working with older parts, a gentle scrub with fine sandpaper or a fiberglass brush can remove stubborn oxidation and improve solder flow.
Organizing Your Workspace
A cluttered workspace slows you down and increases mistakes. Arrange your components, tools, and materials within easy reach before you begin. Use small containers or trays to keep parts sorted by type or project step.
Think about how much easier it is to work when everything is in order. Labeling your containers or using a magnetic parts holder can save time hunting for tiny resistors or capacitors. A tidy area also means fewer accidents, like knocking over your solder or burning your fingers.
Setting Up The Soldering Iron
Before you touch the soldering iron to your components, make sure it’s properly set up. Plug in your iron and let it heat to the right temperature—usually between 350°C and 400°C for most electronics. A temperature-controlled iron helps you avoid overheating sensitive parts.
Tip your iron’s tip with fresh solder to improve heat transfer. This “tinning” step protects the tip and makes your solder flow smoother. Also, keep a damp sponge or brass wire cleaner nearby to wipe the tip regularly during your work. Have you ever struggled with a dirty tip that just won’t melt solder well? Proper setup prevents that hassle.
Basic Soldering Techniques
Mastering basic soldering techniques is essential for anyone working with electronic components. These foundational skills ensure strong, reliable connections that keep your projects running smoothly. Getting comfortable with these techniques will boost your confidence and improve the quality of your work.
Tinning The Tip
Tinning the tip of your soldering iron means coating it with a thin layer of solder before you start. This helps heat transfer more efficiently and protects the tip from oxidation. If you skip this step, you might struggle with inconsistent heating and poor solder joints.
Before turning off your iron, always tin the tip again. It’s a small habit that prolongs the life of your tool and keeps your work cleaner.
Heating The Joint
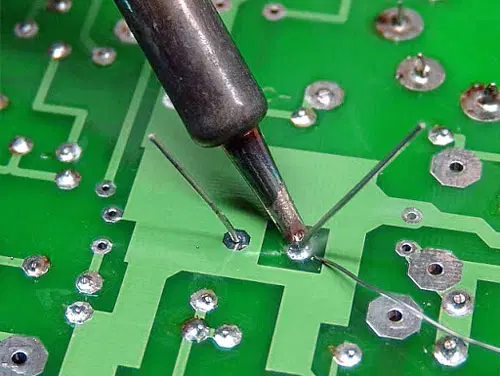
Heat the joint, not just the solder. Place the soldering iron tip so it touches both the component lead and the pad simultaneously. This ensures that both parts reach the right temperature for the solder to flow properly.
If you only heat the solder, it won’t bond well, creating a weak or “cold” joint. A good question to ask yourself: is the joint shiny and smooth, or dull and grainy? The answer tells you if you’ve heated it enough.
Applying Solder Correctly
Once the joint is hot enough, apply the solder to the joint, not the iron tip. The solder should melt and flow evenly around the connection. Too much solder can cause shorts, while too little creates weak joints.
Pull the solder away first, then remove the iron. Let the joint cool naturally without moving the components to avoid cracks. Have you noticed how a well-made joint looks like a tiny volcano? That’s the sweet spot you want to achieve.
Soldering Different Components
Soldering different electronic components requires understanding their unique shapes, sizes, and connection types. Each component demands a slightly different approach to ensure a strong, reliable joint. Mastering these techniques will improve your project’s durability and performance.
Through-hole Components
Through-hole components have leads that pass through holes on the circuit board. These leads offer a solid mechanical connection, making them easier to solder for beginners.
Hold the soldering iron tip to both the lead and the pad simultaneously. Then, feed solder onto the joint, not the iron. The solder should flow smoothly around the lead and pad, creating a shiny, cone-shaped fillet.
Have you noticed solder balls or dull joints? These often mean the solder didn’t heat the parts properly. Make sure the surfaces are clean and the iron is hot enough.
Surface-mount Components
Surface-mount components (SMCs) sit directly on the board’s surface without leads passing through holes. Their tiny size can make soldering tricky but manageable with the right tools and technique.
Use fine-tipped soldering irons and thin solder wire. Apply solder to one pad first, then place the component and gently heat the soldered pad to tack it in place. Next, solder the remaining pads carefully.
Working with tweezers helps prevent moving the component while soldering. If you’ve ever struggled with components sliding away, this small tool will be your best friend.
Wires And Connectors
Soldering wires and connectors involves joining flexible metal strands, which can move and strain the joint. Proper preparation is key to a strong connection.
- Strip the wire ends cleanly without damaging the strands.
- Tin the wire by melting a small amount of solder onto the strands before joining.
- Heat the connector terminal and wire together, then apply solder to form a smooth bond.
Have you ever had a wire joint break after a little movement? Adding heat shrink tubing or mechanical strain relief can protect your soldered connections from stress.
Common Soldering Mistakes
Soldering electronic components can be tricky, especially if you’re just starting out. Mistakes happen, but some are more common and can cause serious issues with your project’s reliability. Understanding these common soldering mistakes can help you avoid frustration and achieve cleaner, stronger connections.
Cold Joints
Cold joints occur when the solder doesn’t properly melt and bond the components together. You might see a dull, grainy finish instead of a shiny, smooth surface. These joints often cause intermittent electrical connections or complete failures.
To fix cold joints, make sure your soldering iron is hot enough and that you heat both the component lead and the pad simultaneously before applying solder. Have you ever noticed a joint that looks suspiciously dull? That’s a cold joint waiting to cause trouble.
Excessive Solder
Adding too much solder is a common mistake that can create shorts between adjacent pins or pads. It also makes your work look messy and harder to troubleshoot later. Excess solder can even cause components to slip out of place before it hardens.
Try using just enough solder to cover the joint smoothly, forming a small, shiny cone shape. If you see blobs or bridges connecting pins, grab your solder wick or a solder sucker to clean it up. Do you really want your project to fail because of a tiny solder bridge?
Overheating Components
Applying heat for too long can damage sensitive electronic parts. Overheated components may lose their functionality or degrade over time. This often happens when you hold the soldering iron on the joint too long, trying to fix a stubborn connection.
Work quickly and efficiently, heating the joint just long enough to melt the solder. If you notice discoloration or smell burning, it’s a sign you’re applying too much heat. How often do you check your soldering iron’s temperature to protect your components?
Testing And Troubleshooting
Testing and troubleshooting are key steps after soldering electronic components. They ensure connections work correctly and prevent device failure. Careful inspection and simple tools help identify and fix issues quickly.
Inspecting Solder Joints
Look closely at each solder joint using good lighting. A good joint looks shiny and smooth. It should cover the pad and the component lead fully. Avoid joints that are dull, cracked, or have gaps. Check for solder bridges that connect two or more pins unintentionally. These can cause shorts and malfunctions.
Using A Multimeter
A multimeter helps check electrical connections and detect faults. Use the continuity mode to test if solder joints connect properly. Place the probes on both ends of the joint; a beep means good connection. Measure resistance to find cold joints or breaks. High resistance indicates poor soldering or damaged parts. Voltage checks can confirm power flow through the circuit.
Reworking Problem Areas
Fix bad solder joints by reheating them with the soldering iron. Remove old solder using a solder wick or a pump. Clean the area with isopropyl alcohol before resoldering. Add a small amount of fresh solder to improve the connection. Avoid overheating components to prevent damage. Repeat testing after rework to ensure the problem is solved.
Tips For Better Soldering
Good soldering requires more than just a hot iron and some wire. Small habits and care make a big difference. Following key tips improves your results and makes your work easier. Focus on your tools, technique, and speed for cleaner, stronger joints.
Maintaining Your Equipment
Keep your soldering iron tip clean and shiny. Use a damp sponge or brass wool to wipe off excess solder. Replace worn tips to ensure even heat transfer. Check your solder wire for freshness to avoid poor flow. Store your iron properly to prevent damage and rust.
Practicing Proper Technique
Heat the joint, not just the solder. Touch the solder to the heated joint, not the iron tip. Hold the iron steady and allow solder to flow smoothly. Avoid moving parts while solder cools. Use the right amount of solder to avoid blobs or weak joints.
Improving Speed And Accuracy
Arrange components neatly before soldering. Use helping hands or clamps to hold parts steady. Work in a well-lit area to see details clearly. Practice quick, confident motions to reduce cold joints. Plan your steps to avoid unnecessary repositioning.

Credit: www.familyhandyman.com

Credit: www.youtube.com
Frequently Asked Questions
What Tools Are Essential For Soldering Electronic Components?
Essential soldering tools include a soldering iron, solder wire, flux, tweezers, and a sponge. These tools help create precise and clean solder joints. Proper tools ensure safety and efficiency during the soldering process, improving the quality of your electronic projects.
How Do I Prepare Components For Soldering?
Clean the component leads and PCB pads with isopropyl alcohol. Apply a small amount of flux to improve solder flow. Proper preparation ensures strong, reliable connections and reduces the risk of cold solder joints or component damage.
What Is The Correct Soldering Temperature To Use?
Set the soldering iron between 350°C and 400°C (662°F to 752°F). This range melts solder efficiently without damaging components. Adjust temperature based on solder type and component sensitivity for optimal results.
How Can I Avoid Cold Solder Joints?
Ensure the soldering iron heats both the component lead and pad evenly. Apply solder only when surfaces are hot enough. Cold solder joints appear dull and weak, causing poor electrical connections and potential circuit failure.
Conclusion
Soldering electronic components is a useful skill anyone can learn. Practice helps improve your technique and build confidence. Always keep safety in mind during the process. Good solder joints make circuits work well and last long. Start with simple projects and move to harder ones.
Soon, you will enjoy fixing and creating electronics yourself. Keep your tools clean and organized for better results. Small steps lead to big progress in soldering skills.