Which Electronic Component: Ultimate Guide to Choosing the Best
Introduction
Staring at a pile of disparate electronic parts, trying to figure out which resistor, capacitor, or microcontroller will bring your project to life? Whether you’re building a custom mechanical keyboard, repairing a vintage audio amplifier, or prototyping a smart home sensor, selecting the right electronic component is the difference between a functional, reliable build and a frustrating pile of dead parts. The wrong choice can cause immediate circuit failure, long-term performance issues, or even safety hazards like overheating or fire.
This guide cuts through confusing jargon to deliver actionable, experience-backed guidance for choosing components for any project, from beginner hobbyist builds to small-scale commercial products. We’ll cover core component categories, key selection criteria, sourcing best practices, and 2026 industry trends to help you make informed, confident decisions every time.
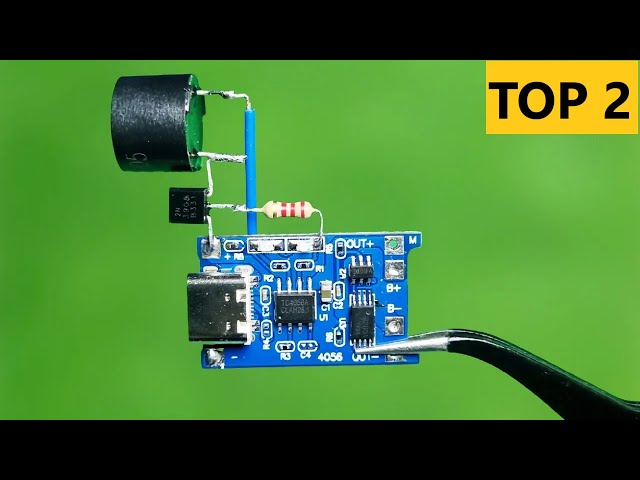
 Video walkthrough of common component selection mistakes for new hobbyists
Image source: www.youtube.com
Video walkthrough of common component selection mistakes for new hobbyists
Image source: www.youtube.com
Core Electronic Components: Passive Parts Explained
Passive components cannot amplify or generate electrical signals on their own, but they control current flow, store energy, and filter signals to form the foundation of every electronic circuit. All compliant electronic components meet standards set by bodies like the IEEE to ensure interoperability and safety across devices.
Resistors: Current Limiting and Signal Shaping
Resistors are the most ubiquitous passive component in electronics, designed to limit electric current flow and divide voltage across circuits. They are used for critical functions including current limiting for LEDs and other sensitive parts, voltage division for signal processing, and pull-up/pull-down configuration for digital logic circuits to prevent floating pins.
Resistors come in two primary form factors: through-hole (for breadboarding and hand-soldered projects) and surface-mount device (SMD, for compact PCB designs). Common types include carbon film (low-cost, general purpose), metal film (low noise, high precision for analog circuits), and wirewound (high power rating for power supplies and motor controls). Key specs to evaluate are resistance value (measured in ohms, Ω), tolerance (percentage of variance from the stated value, e.g., 1% for precision circuits, 5% for general use), and power rating (typically 1/4W for low-power circuits, up to 100W for high-power applications).
A common mistake for new builders is using a resistor with too low a power rating: for example, a 1/4W resistor used in a circuit that dissipates 0.3W will overheat and fail within hours. As a rule of thumb, always select a resistor with a power rating at least 2x the expected power dissipation for your circuit. For a standard 5mm red LED powered by a 9V battery, a 330Ω 1/4W resistor is the ideal choice to limit current to a safe 20mA level.
Capacitors: Energy Storage and Signal Filtering
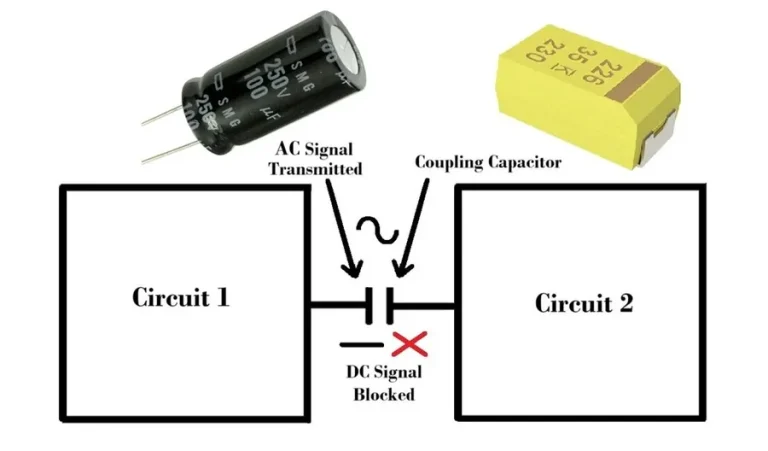
Capacitors store and release electrical energy quickly, making them critical for smoothing voltage fluctuations, filtering signal noise, and creating timing delays in circuits. They are measured in farads (F), with common values ranging from picofarads (pF) for high-frequency RF circuits to millifarads (mF) for power supply filtering.
The two most common types are ceramic capacitors (non-polarized, low cost, ideal for high-frequency decoupling) and electrolytic capacitors (polarized, high capacitance, used for power supply smoothing and energy storage). Other specialized types include tantalum capacitors (stable, low leakage, for compact portable devices) and film capacitors (low noise, for audio circuits). Key specs to evaluate are capacitance value, voltage rating (always select a capacitor with a voltage rating at least 20% higher than the maximum circuit voltage), tolerance, and equivalent series resistance (ESR, lower is better for high-frequency applications).
A common error is installing a polarized electrolytic capacitor backward, which can cause it to overheat, leak, or even explode. For projects with tight power constraints, low-ESR capacitors reduce energy waste and improve circuit efficiency by up to 15%.
 Common electrolytic capacitor used for power supply filtering in consumer electronics
Image source: www.electronicsandyou.com
Common electrolytic capacitor used for power supply filtering in consumer electronics
Image source: www.electronicsandyou.com
Inductors: Magnetic Energy and EMI Suppression
Inductors store energy in a magnetic field when current passes through them, resisting changes in current flow to filter high-frequency noise and step voltage up or down in power supplies. They are measured in henries (H), with common values ranging from microhenries (µH) for RF circuits to millihenries (mH) for power converters.
Common inductor types include air core (low loss, for high-frequency RF applications), ferrite core (high inductance in a small package, for power supplies), and toroidal (low electromagnetic interference, for audio and sensitive analog circuits). Key specs to evaluate are inductance value, current rating (exceeding this causes core saturation and overheating), DC resistance (lower is better for efficiency), and shielding (critical for circuits near sensitive sensors or RF components).
Inductors are a core component of buck, boost, and buck-boost converters that step battery voltage up or down to power microcontrollers, sensors, and other low-voltage parts. A 10µH ferrite core inductor, for example, is a standard choice for 5V to 3.3V step-down converters that power ESP32-based IoT projects.
Active Components: Powering Circuit Functionality
Active components can amplify signals or control current flow, enabling circuits to perform complex tasks like processing data, switching high-power loads, and converting power types. Unlike passive components, they require an external power source to operate.
Transistors: Switching and Amplification
Transistors are tiny semiconductor devices that act as electronic switches or amplifiers, and are the building block of all modern digital electronics. The two primary families are Bipolar Junction Transistors (BJTs) and Field Effect Transistors (FETs, including MOSFETs). BJTs are ideal for low-power analog amplification (e.g., audio circuits), while MOSFETs are far more efficient for high-current switching applications (e.g., controlling LED strips, DC motors, or power relays).
Key specs to evaluate for transistors are current rating (Ic for BJTs, Id for MOSFETs: the maximum current the part can handle without damage), voltage rating (Vce for BJTs, Vds for MOSFETs: the maximum voltage across the part), and gain (hFE for BJTs, the ratio of output current to input current). A common mistake is forgetting to add a current-limiting base resistor for BJTs, which can burn out the transistor or the driving microcontroller pin. For most general-purpose low-power switching tasks, a 2N2222 BJT or 2N7000 MOSFET is a reliable, low-cost choice; for high-current applications (30A or more), an IRF540 N-channel MOSFET is a standard option.
Diodes: One-Way Current Flow and Voltage Regulation
Diodes allow current to flow in only one direction, making them critical for converting AC to DC power, protecting circuits from reverse voltage, and generating light. Common types include:
- Rectifier diodes (e.g., 1N4007): for AC-DC conversion in power supplies
- Zener diodes: for voltage regulation, e.g., a 5.1V Zener diode protects 5V circuits from overvoltage spikes
- Schottky diodes: low forward voltage drop, ideal for high-efficiency power supplies and solar panel blocking diodes
- Light Emitting Diodes (LEDs): for indicators, displays, and lighting, with forward voltages ranging from 1.8V (red) to 3.3V (white/blue)
A common mistake is using a standard rectifier diode in high-frequency switching circuits, where a Schottky diode will generate less heat and improve efficiency by 10-20%. Always verify a diode’s forward current and reverse voltage ratings match your circuit’s requirements to avoid premature failure.
Integrated Circuits: Compact Complex Functionality
Integrated circuits (ICs) pack hundreds to billions of individual transistors, resistors, and capacitors into a single tiny chip, enabling complex functionality in a compact, low-cost package. ICs fall into three main categories: analog (e.g., op-amps for signal amplification, voltage regulators for power supply control), digital (e.g., logic gates, memory chips, microcontrollers), and mixed-signal (combining analog and digital functions, e.g., ADCs for sensor data conversion).
ICs come in a range of packages: through-hole DIP for breadboarding, and SMD packages like SOIC, QFN, and BGA for compact PCB designs. Key specs to evaluate include operating voltage range, clock speed, memory capacity, number of input/output (GPIO) pins, and communication interfaces (UART, I2C, SPI, USB). A common mistake is miswiring an IC’s power or ground pins, which can destroy the part instantly. Always cross-reference the manufacturer’s official pinout diagram in the datasheet before soldering or wiring an IC.
Specialized Components for Advanced Use Cases
Beyond core passive and active parts, specialized components enable advanced functionality for smart devices, user interfaces, and sensing applications.
Microcontrollers: On-Board Processing for Smart Devices
Microcontrollers are tiny, self-contained computers that run custom code to read sensor data, control outputs, and communicate with other devices. They are the core of all embedded electronics, from smart thermostats to wearable fitness trackers.
Key specs to evaluate include clock speed (higher = faster processing), memory (flash for storing code, RAM for running processes), number of GPIO pins, communication interfaces, and power consumption. Popular families for hobbyists and small builders include the Arduino Uno (ATmega328P chip, beginner-friendly, wide community support), ESP32 (built-in Wi-Fi/Bluetooth, ideal for IoT projects), and Raspberry Pi Pico (low-cost, RP2040 chip, great for general-purpose projects). Microcontrollers are the core of many productivity-focused business hardware, from portable scanners to voice-controlled task managers for remote workers.
A common mistake is not accounting for the total current draw of all connected peripherals (sensors, displays, motors) when powering a microcontroller, leading to brownouts and random resets. Always add a 20-50% current margin to your power supply’s capacity to avoid this issue.
Sensors: Environmental and Motion Detection
Sensors detect changes in the physical world and convert them into electrical signals that microcontrollers can process. Common categories include:
- Environmental: temperature, humidity, air quality, barometric pressure
- Motion: accelerometers, gyroscopes, PIR (passive infrared) motion sensors
- Proximity: ultrasonic, infrared, LiDAR
- Optical: light, color, image sensors
Key specs to evaluate include accuracy, measurement range, interface (analog, I2C, SPI), power consumption, and operating temperature range. For example, a DHT22 is a low-cost, reliable choice for hobbyist temperature and humidity monitoring, while a BMP280 barometric sensor offers higher accuracy for altitude tracking and weather forecasting. When building custom smart home sensors, remember that securing connected smart home systems is just as important as selecting the right hardware components to prevent unauthorized access.
Displays: Visual Output for User Interfaces
Displays provide visual feedback to users, with options ranging from simple single-color indicators to high-resolution touchscreens. Common types include:
- LED displays: 7-segment or matrix displays for simple numeric/alphanumeric output, low power, low cost
- LCDs: low-power, good for bright environments, common in consumer electronics
- OLEDs: high contrast, wide viewing angles, thin profile, ideal for wearables and portable devices
- E-ink: ultra-low power, readable in direct sunlight, perfect for e-readers and low-update-rate displays
Key specs to evaluate include size, resolution, interface (SPI, I2C, parallel), power consumption, and viewing angle. A 1.3" OLED display is a popular choice for wearable fitness trackers due to its high contrast and low power draw, while a 7" TFT touchscreen is ideal for portable control panels for smart home devices.
Step-by-Step Component Selection Workflow
A structured selection process eliminates guesswork and reduces the risk of costly mistakes. Follow this workflow for every project:
1. Define Project Specifications
Before searching for parts, write down every non-negotiable requirement for your build. Include:
- Operating voltage and current ranges
- Environmental conditions (operating temperature, humidity, exposure to water/dust, IP rating needs)
- Size and weight constraints
- Power efficiency targets
- Regulatory requirements (e.g., UL certification for consumer products, RoHS compliance for EU sales)
For example, if building an outdoor smart garden sensor, you need components that operate from -20°C to 70°C, have IP67 water resistance, and draw <10mA of current to run off a small solar panel and battery. This step eliminates 90% of incompatible parts before you start comparing options.
2. Shortlist Candidate Components
Use parametric search tools on authorized distributor sites (Digi-Key, Mouser, LCSC) to filter parts by your required specs. Prioritize parts from manufacturers with ISO 9001 quality certification and long-term production status (avoid end-of-life parts unless you are repairing an old device). For each required spec, note minimum, maximum, and ideal values. For example, if you need a 5V voltage regulator, filter for parts that output 5V±2%, can handle at least 500mA of current, and come in a TO-220 package for easy heat sinking if needed.
3. Validate Specs Against Requirements
Download the official datasheet for every candidate component directly from the manufacturer’s website (never rely on third-party spec sheets, which often contain errors). Cross-check every key spec: voltage/current ratings, temperature ranges, pinout, package dimensions, and recommended application circuits. For critical components (power regulators, microcontrollers, high-current switches), note any recommended external components (e.g., capacitors, resistors) required for stable operation.
4. Source and Test Samples
Order 2-3 sample units of your top candidate parts from authorized distributors to test in your actual circuit. Test for functionality, performance under load, and reliability over 72 hours of continuous operation. If a part fails testing, move to the next candidate on your shortlist. This step avoids costly bulk orders of defective or incompatible parts.
Key Selection Criteria to Avoid Costly Mistakes
Evaluating Performance and Safety Margins
Never run a component at 100% of its rated capacity. Add a 20-50% safety margin to account for voltage spikes, temperature variations, and component aging. For example, if you need a resistor that dissipates 0.2W, choose a 0.5W resistor to avoid overheating. For power supply components, select capacitors and inductors with voltage and current ratings at least 25% higher than the maximum expected circuit values to prevent failure during transient events.
Ensuring Compatibility Across Your Design
Components do not work in isolation, so compatibility is just as important as individual specs. Evaluate three key compatibility areas:
- Electrical compatibility: Match voltage levels (3.3V vs 5V logic: never connect a 5V output to a 3.3V input without a level shifter), current sourcing/sinking capabilities (most microcontroller pins can only source ~20mA, so never connect an LED directly without a current-limiting resistor), and communication protocols (I2C devices need unique addresses, SPI requires matching clock polarity/phase).
- Physical compatibility: Confirm the component footprint fits your PCB or breadboard (e.g., 0805 vs 1206 SMD resistors, DIP vs SOIC IC packages) and that pin pitch matches your board layout.
- Software compatibility: For microcontrollers and ICs, confirm that your development environment supports the part and that any required libraries are available.
When building IoT projects that integrate with voice assistants, confirming compatibility with voice assistant smart devices is just as important as matching electrical specs between components.
Balancing Cost, Availability, and Reliability
The cheapest component is rarely the best value. Balance upfront cost with long-term reliability and availability:
- Unit cost: Bulk buying reduces per-part costs, but avoid overbuying parts you will never use.
- Quality vs price: A 10¢ resistor from an unvetted supplier may have a 10% tolerance instead of the stated 1%, leading to circuit failures; a 20¢ resistor from a reputable brand is more reliable for critical circuits.
- Availability: Common parts (1kΩ resistors, 555 timer ICs) are always in stock and cheap; rare or obsolete parts can cost 10x more and have lead times of 12+ weeks. For commercial products, prioritize parts with guaranteed long-term availability to avoid production delays.
- Total cost of ownership: A cheap capacitor that fails after 6 months will cost more in time and materials to replace than a higher-quality part that lasts 10 years. For consumer electronics projects, factoring in the long-term energy use of components can help you balance upfront cost with ongoing expenses, similar to how you would evaluate monthly energy costs for home electronics.
Sourcing Trusted, Authentic Components
Counterfeit electronic components are a widespread problem, especially for high-demand parts like microcontrollers, power transistors, and ICs. Industry groups like the IPC have established strict guidelines for component authentication to combat the widespread issue of fake parts in the global supply chain.
Authorized Distributors and Retail Channels
Stick to authorized distributors for most projects: Digi-Key, Mouser, Arrow Electronics, and LCSC for hobbyist and professional use. These suppliers source directly from manufacturers, so counterfeit risk is extremely low, and they provide full traceability required for commercial regulatory certification (FCC, CE, UL). For small, low-cost parts (resistors, capacitors, LEDs), reputable hobbyist retailers like Adafruit, SparkFun, and Pololu are reliable for small-scale projects. Avoid unvetted sellers on marketplaces like AliExpress or eBay for critical components, as counterfeit and salvaged parts are common. If you do buy from a marketplace, check seller ratings, look for authentic product photos, and verify part markings against the official datasheet.
Online vs. Offline Purchasing Trade-Offs
Online purchasing is ideal for most use cases: you get access to millions of parts, detailed spec sheets, customer reviews, and fast shipping from local warehouses. Many distributors offer same-day shipping for in-stock parts. Offline purchasing (local electronics stores, maker space supply shops) is useful if you need parts immediately for a same-day repair, or want to physically inspect components before buying. For example, if you need a replacement capacitor for a broken amplifier right away, a local electronics store is faster than waiting for shipping. The trade-off is that offline stores have a much smaller inventory and higher per-part prices. A common mistake is buying a generic "equivalent" part offline without verifying its specs against the original, leading to compatibility issues.
Verifying Authenticity to Avoid Counterfeits
To avoid fake parts, follow these verification steps:
- Check packaging: genuine parts have professional, sealed packaging with manufacturer logos, part numbers, and date codes that match the manufacturer's format.
- Inspect part markings: counterfeit parts often have blurry, uneven, or misspelled markings, and the part's weight or feel may be off.
- Use a component tester: cheap handheld testers can verify resistance, capacitance, and transistor functionality to confirm a part matches its stated specs.
- Require a certificate of conformance (CoC) for critical applications (medical devices, automotive, aerospace) to prove parts meet manufacturer specifications.
 Reddit's r/electronics community shares real-world sourcing and testing advice from experienced builders
Image source: www.reddit.com
Reddit's r/electronics community shares real-world sourcing and testing advice from experienced builders
Image source: www.reddit.com
2026 Electronics Component Trends
Miniaturization and Advanced Packaging
Components continue to shrink while delivering higher performance, driven by demand for smaller wearable devices, smartphones, and IoT sensors. As of 2026, 3nm and 2nm process nodes are in mass production for microprocessors, enabling faster, more power-efficient chips for edge devices. New packaging technologies like chip-on-board (COB) and 3D stacking integrate multiple dies into a single compact package, reducing board space by up to 70% compared to traditional QFN packages. For hobbyists and small builders, this means more powerful microcontrollers (like the ESP32-S3 with integrated AI acceleration) are available in tiny, low-cost modules for under $5. The shift from through-hole to all-SMD designs for consumer products also makes SMD soldering an increasingly valuable skill for all builders.
The push for smaller, more efficient components has directly enabled the benefits of modern wearable tech, from fitness trackers to medical monitoring devices.
Embedded Intelligence in Low-Cost Parts
Embedded intelligence is becoming standard even in low-cost components. As of 2026, smart sensors with built-in microcontrollers can process data locally, reducing the need for a separate main processor and cutting power consumption by 50% or more for IoT devices. For example, smart temperature sensors can trigger alerts or adjust system settings without sending data to a central hub, improving response time and privacy. Programmable power management ICs automatically adjust voltage and current output based on load, extending battery life in portable devices by 20-30% compared to fixed regulators. As the global smart device adoption rates continue to climb, these embedded components will enable even more seamless, efficient connected experiences.
Sustainable and RoHS-Compliant Designs
Regulations like the EU's Restriction of Hazardous Substances (RoHS) and the US's Electronics Challenge have driven widespread adoption of lead-free, halogen-free components as of 2026. Most new components are manufactured with recycled materials, and many manufacturers offer take-back programs for end-of-life parts to reduce e-waste. For builders, this means most components you buy are RoHS-compliant by default, but always check the datasheet if you're working on a project that requires specific material certifications. A growing trend is modular, repairable component designs: for example, many new smartphones have user-replaceable batteries and modems, reducing electronic waste and extending device lifespan.
Frequently Asked Questions
What are the most common electronic components for beginner DIY projects?
For beginners, the most useful components to stock are: through-hole and SMD resistors (common values from 10Ω to 1MΩ), ceramic and electrolytic capacitors (100pF to 1000µF), 1N4007 rectifier diodes, 2N2222 BJTs and IRF540 N-channel MOSFETs, 555 timer ICs, ATmega328P or ESP32 microcontrollers, DHT22 temperature/humidity sensors, and 16×2 character LCDs. These parts can be used to build hundreds of common projects, from LED blinkers to smart home sensors, without needing rare or specialized components.
How do I decode markings on electronic components?
Markings vary by component type: resistors use color bands (4 or 5 bands: first two/three are significant digits, next is multiplier, last is tolerance) or numeric codes (e.g., 103 = 10,000pF = 10nF). Capacitors often print the value directly (e.g., 100µF) plus voltage rating and tolerance. ICs have a part number printed on the top that you can look up in the manufacturer's datasheet to confirm specs. For SMD components, 3-digit codes are common (e.g., 104 = 100,000pF = 0.1µF). You can use free online marking decoders or reference charts from component manufacturers to confirm values if you're unsure.
Why is selecting the correct electronic component critical for project success?
Using the wrong component can cause immediate circuit failure (e.g., a capacitor with too low a voltage rating exploding when power is applied), long-term reliability issues (e.g., a resistor with too low a power rating overheating and failing after a few hours of use), or even safety hazards like fire or electric shock. For commercial products, using non-compliant components can lead to failed regulatory certification (FCC, CE, UL) and product recalls. For hobby projects, it saves you time, money, and frustration by avoiding rework and failed builds.
What key factors should I consider when selecting electronic components?
The core factors to evaluate are: 1) Electrical specs (voltage/current ratings, tolerance, frequency response, power dissipation), 2) Environmental specs (operating temperature range, humidity resistance, IP rating for outdoor use), 3) Physical specs (footprint, size, weight, pin configuration), 4) Reliability (mean time between failures, manufacturer quality ratings), 5) Availability (lead time, long-term production status), and 6) Cost (unit cost, total cost of ownership including potential failure costs). Always prioritize specs that impact safety and core functionality over minor cost savings.
Conclusion
Choosing the right electronic component requires balancing performance specs, compatibility, cost, and reliability to meet your project’s unique needs. By following the structured workflow outlined above, prioritizing safety margins, and sourcing parts from authorized distributors, you can avoid the most common selection mistakes and build projects that work as intended, every time.
As you gain experience, you’ll develop an intuition for component selection, but always reference official datasheets first, test sample parts before bulk ordering, and prioritize long-term reliability over the lowest upfront cost. If you’re looking for more project guides and component reviews to kick off your next build, check out our library of electronics tutorials for step-by-step walkthroughs of common DIY projects.